
This website contains affiliate links. This means that if you click on one of these links and make a purchase, we may receive a small commission at no additional cost to you. We only recommend products or services that we believe will add value to our readers. All opinions expressed here are our own. Your support through these links helps us keep this site running. Thank you!
How to Paint a Room Like a Pro: A Complete Step-by-Step Guide
Painting a room is one of the easiest and most affordable ways to completely transform your home. Whether you’re refreshing a bedroom, updating a living room, or giving your entire home a new look, proper preparation and technique can make all the difference between a DIY project that looks amateur and one that looks professionally done.
In this guide, you’ll learn exactly how to paint a room from start to finish, including the best order to paint ceilings, walls, and trim, along with expert tips to help you achieve beautiful results.
Step 1: Plan Your Project
Before opening a paint can, take a little time to plan your project. Choosing colors, calculating paint quantities, and gathering supplies beforehand will make the entire process smoother.
Find Color Inspiration
One of the most exciting parts of painting is choosing colors. Whether you love soft neutrals, coastal blues, modern farmhouse tones, or bold statement colors, selecting the right palette can completely change the mood of a room.
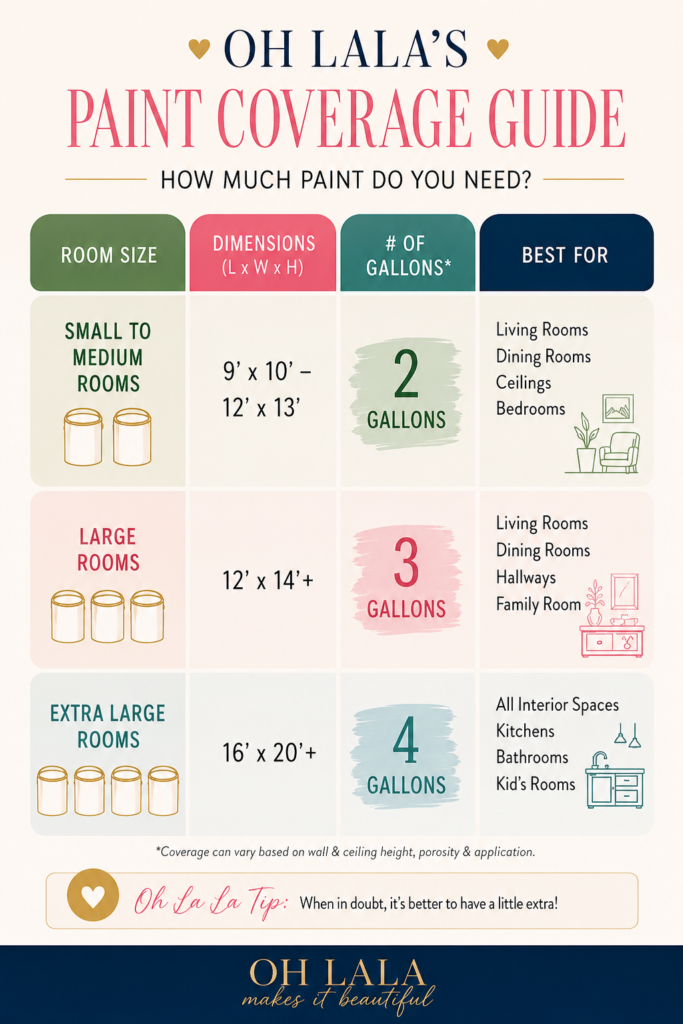
Estimate How Much Paint You Need
The amount of paint needed depends on:
Room size
Ceiling height
Surface texture
Number of coats
Paint color changesAs a general rule, one gallon of paint covers approximately 350–400 square feet.
Gather Your Supplies
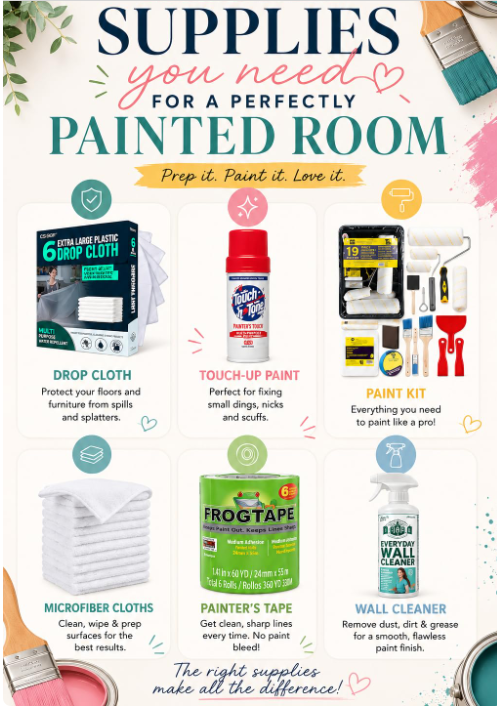
Having the proper tools on hand saves time and helps create a professional-looking finish.
Essential painting supplies include:
- Interior paint
- Paint brushes
- Paint rollers and roller covers
- Paint tray and liners
- Painter’s tape
- Drop cloths
- Sandpaper
- Spackle or wall filler
- Putty knife
- Primer (if needed)
- Extension pole for ceilings
Step 2: Prep the Room
Preparation is the secret to a beautiful paint job. Don’t skip this step.
Move and Protect Furniture
Move furniture out of the room whenever possible. Cover remaining furniture and flooring with drop cloths to protect against spills and splatters.
Clean the Surfaces
Dust, dirt, and grease can prevent paint from adhering properly.
Wipe walls and trim with a mild detergent solution and allow everything to dry completely before painting. The key to maintaining attractive, healthy spaces is understanding how to wash walls without harming the paint. First, you’ll want to consider the paint sheen on your walls. Flat and matte finishes are less durable than Satin or Semi-Gloss, meaning you’ll want to avoid scrubbing too hard. It’s also important to use non-abrasive cleaning rags or sponges and mild cleaning solutions to prevent damaging the surface. Here are some general methods for cleaning your painted walls:
Whether your walls are in excellent condition or you’re preparing to deep-clean the surfaces, it’s ideal to dust them regularly. The easiest method is running your vacuum’s dust brush attachment along the walls and ceilings.
Sometimes, your walls require a deeper cleaning than dusting. Still, using the best cleaner for painted walls is vital: mild soap and warm water. This mixture will be tough on dirt and gentle on your walls, ensuring a clean and damage-free surface. We recommend using a soft cloth or sponge to scrub the walls in circular motions. Finish by lightly rinsing the walls with a wet rag to remove any remaining cleaning solution. Remember to thoroughly ring out the cloth or sponge before using it on the wall, as too much water can hurt the paint.
Repair Imperfections
Fill nail holes, dents, and cracks using spackle or wall filler. Once dry, sand smooth for an even surface.
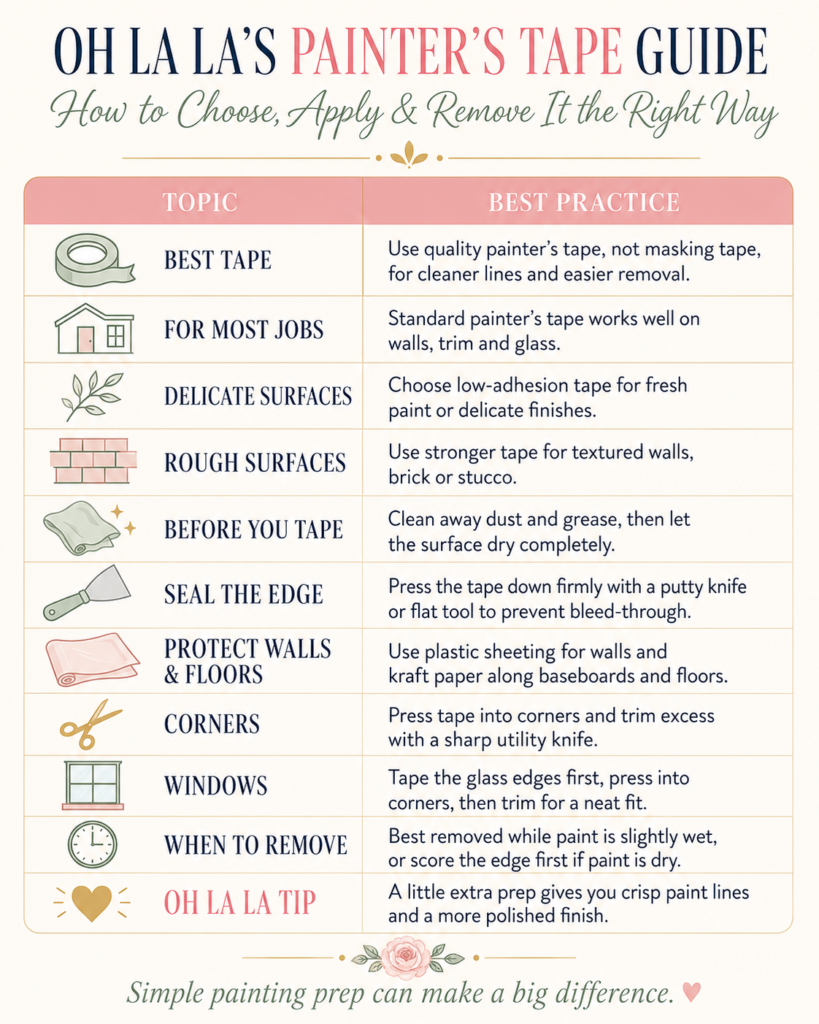
Apply Painter’s Tape
Taking a few extra minutes here creates crisp, professional-looking paint lines.
Use painter’s tape around:
- Baseboards
- Window trim
- Door frames
- Light switches
- Outlets
- Ceiling edges
Prime if Necessary
Primer is especially important when:
- Painting over dark colors
- Covering stains
- Painting new drywall
- Switching paint finishes
Primer helps paint adhere better and creates a more durable finish.
Step 3: Paint the Ceiling First
Professional painters always start with the ceiling.
Why?
Because any drips or splatters can be covered when you paint the walls later.
Ceiling Painting Tips
- Use a flat or low-luster ceiling paint.
- Use an extension pole to reduce fatigue.
- Roll in overlapping sections.
- Maintain a wet edge to avoid visible lines.
- Use a thicker roller nap for textured ceilings.
Allow the ceiling to dry completely before moving on.
Step 4: Paint the Walls
Once the ceiling is dry, it’s time for the walls.
Cut In First
Using an angled brush, paint a 2–3 inch border around:
- Ceiling lines
- Corners
- Trim
- Doors
- Windows
This technique is called “cutting in.”
Roll the Walls
After cutting in, use a roller to fill the larger wall areas.
For the smoothest finish:
- Use a “W” or “N” pattern.
- Work in manageable sections.
- Keep a wet edge.
- Blend roller strokes as you go.
Apply a Second Coat
Most rooms look best with two coats of paint.
Allow the first coat to dry completely before applying the second. Always follow the manufacturer’s drying recommendations.
🖌️Pro Tip
Paint the shorter wall first if possible. This helps you establish a rhythm and maintain consistent coverage throughout the room.
Step 5: Paint Trim, Doors, and Windows
Painting trim last helps prevent accidental wall touch-ups later.
Best Paint Finish for Trim
Semi-gloss and gloss paints are popular choices because they:
- Resist scuffs
- Clean easily
- Provide durability
- Create subtle contrast with walls
Trim Painting Tips
- Use a high-quality angled brush.
- Apply smooth, even strokes.
- Avoid overloading your brush.
- Work slowly for precise edges.
Should You Paint Walls or Trim First?
Walls first.
Painting walls before trim makes the process easier and reduces the chances of needing touch-ups later.
Final Tips for a Professional Finish
Paint During Daylight
Natural light helps reveal missed spots, uneven coverage, and color variations.
Remove Painter’s Tape Carefully
For the cleanest lines, remove tape within 24 hours after painting.
Ensure Good Ventilation
Open windows and use fans to improve airflow and speed drying times.
Consider Decorative Techniques
Want to add personality to your space?
Try:
- Accent walls
- Color blocking
- Murals
- Geometric patterns
- Stencil designs
These techniques can add visual interest and create a custom designer look.
🏠💖Create a Home You Love
Painting is one of the simplest ways to refresh your home and make a dramatic impact. With proper preparation, quality supplies, and the right painting order, you can achieve beautiful, professional-looking results.
If you’re looking for paint color inspiration, room makeovers, decorating ideas, and interior design tips, be sure to visit my other pages- You’ll find endless inspiration to help transform every room in your home.